Before you try this, you should see the simpler ListView example.
A Quick Guide to Android ListView and ArrayAdapter
If you want to display more than a single TextView (a line of text) for each item in your ArrayList, you can customize the display of each item.
(Example code at bottom of page)
(Suggestion: paste example code into a desktop text editor to make it easier to read, because the lines wrap around in WordPress)
This requires two extra things that weren’t included in the simpler example:
- XML layout file that shows how each item will be displayed
- Custom ArrayAdapter class
This also assumes that you have your own java class that defines the type of data you want to store and display (i.e. includes attributes, constructor, getters, setters). That could have been done in the simpler example as well, but that example uses Strings instead of custom objects to keep things as simple as possible.
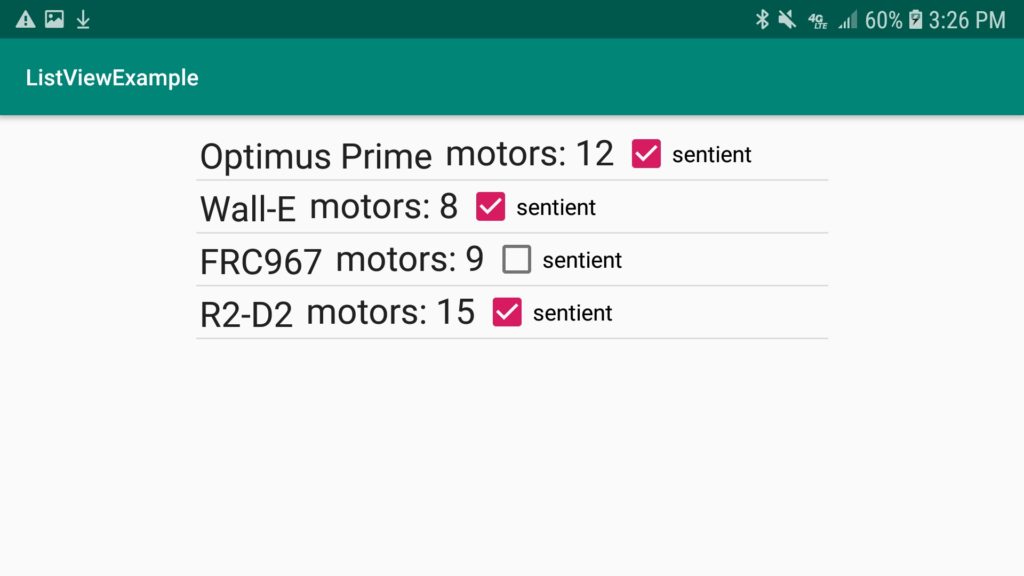
Robot Objects:
For this example, Robot objects from an ArrayList<Robot> will be displayed in a ListView. Each Robot will display a name, a number of motors it has, and a checkbox indicated whether it is sentient.
We want it to look something like this:
MainActivity Class:
- Creates Robot objects in an ArrayList<Robot> named robots.
- Creates a ListView named lv.
- Creates a CustomAdapter named ca using a custom Java class that extends ArrayAdapter.
- Sets the ArrayAdapter of lv to ca.
public class MainActivity extends AppCompatActivity {

    ArrayList robots;
    ListView lv;
    @Override
    protected void onCreate(Bundle savedInstanceState) {
        super.onCreate(savedInstanceState);
        setContentView(R.layout.activity_main);

        robots = new ArrayList();
        robots.add(new Robot("Optimus Prime", 12, true));
        robots.add(new Robot("Wall-E", 8, true));
        robots.add(new Robot("FRC967", 9, false));
        robots.add(new Robot("R2-D2", 15, true));

        lv = findViewById(R.id.listview1);
        CustomAdapter ca = new CustomAdapter(this, robots);
        lv.setAdapter(ca);
    }
}
Robot Java Class File
(needed to create Robot objects in MainActivity)
public class Robot {
    String name;
    int motors;
    boolean sentient;

    public Robot(String name, int motors, boolean sentient) {
        this.name = name;
        this.motors = motors;
        this.sentient = sentient;
    }

    public String getName() {
        return name;
    }

    public void setName(String name) {
        this.name = name;
    }

    public int getMotors() {
        return motors;
    }

    public void setMotors(int motors) {
        this.motors = motors;
    }

    public boolean isSentient() {
        return sentient;
    }

    public void setSentient(boolean sentient) {
        this.sentient = sentient;
    }
}
CustomAdapter Java class
- Constructor method calls the superclass constructor method.
- Overrides the getView() method of the ArrayAdapter superclass.
- getView() refers to the XML layout file for individual robot objects.
- getView() creates TextView and CheckBox objects
- populates TextViews and CheckBox with information from the robot object.
- To create something like this, create a Java class. Then add “extends ArrayAdapter.”
- Next, create a constructor (a method with the same name as the class) that overrides the superclass constructor. You can copy the constructor in the example below and change the class names to match your project.
- Next, use Control-O to override a method, and select getView(). Now you can add your custom views, using the example as a guide.
public class CustomAdapter extends ArrayAdapter {

    //constructor method calls superclass constructor
    public CustomAdapter(Context context, ArrayList robots){
        super(context, 0, robots);
    }

    @Override
    public View getView(int position, View convertView, ViewGroup parent) {
        //retrieve data from object
        Robot r = (Robot) getItem(position);

        //create the views for this object
        convertView = LayoutInflater.from(getContext()).inflate(R.layout.list_item, parent, false);
        TextView name = convertView.findViewById(R.id.name);
        TextView motors = convertView.findViewById(R.id.motors);
        CheckBox sentient = convertView.findViewById(R.id.sentient);

        //set the display values for the view from object data
        name.setText(r.getName());
        motors.setText("motors: "+r.getMotors());
        sentient.setChecked(r.isSentient());

        return convertView;

    }
}
XML layout file for individual robot items:
(note that it contains two TextView and one CheckBox)
<android.support.constraint.ConstraintLayout xmlns:android="http://schemas.android.com/apk/res/android"
    xmlns:app="http://schemas.android.com/apk/res-auto"
    xmlns:tools="http://schemas.android.com/tools"
    android:layout_width="match_parent"
    android:layout_height="match_parent">


    <TextView
        android:id="@+id/name"
        android:layout_width="wrap_content"
        android:layout_height="wrap_content"
        android:layout_marginStart="2dp"
        android:layout_marginTop="2dp"
        android:text="TextView"
        android:textAppearance="@style/TextAppearance.AppCompat.Large"
        app:layout_constraintStart_toStartOf="parent"
        app:layout_constraintTop_toTopOf="parent" />

    <TextView
        android:id="@+id/motors"
        android:layout_width="wrap_content"
        android:layout_height="wrap_content"
        android:layout_marginStart="8dp"
        android:layout_marginEnd="160dp"
        android:text="TextView"
        android:textAppearance="@style/TextAppearance.AppCompat.Large"
        app:layout_constraintEnd_toEndOf="parent"
        app:layout_constraintHorizontal_bias="0.0"
        app:layout_constraintStart_toEndOf="@+id/name"
        app:layout_constraintTop_toTopOf="parent" />

    <CheckBox
        android:id="@+id/sentient"
        android:layout_width="wrap_content"
        android:layout_height="wrap_content"
        android:layout_marginStart="4dp"
        android:text="sentient"
        app:layout_constraintStart_toEndOf="@+id/motors"
        app:layout_constraintTop_toTopOf="parent" />

</android.support.constraint.ConstraintLayout>
activity_main.xml layout file
(note that it has a ListView element with an id)
<?xml version="1.0" encoding="utf-8"?>
<android.support.constraint.ConstraintLayout xmlns:android="http://schemas.android.com/apk/res/android"
    xmlns:app="http://schemas.android.com/apk/res-auto"
    xmlns:tools="http://schemas.android.com/tools"
    android:layout_width="match_parent"
    android:layout_height="match_parent"
    tools:context=".MainActivity">

    <ListView
        android:id="@+id/listview1"
        android:layout_width="395dp"
        android:layout_height="685dp"
        android:layout_marginTop="8dp"
        app:layout_constraintEnd_toEndOf="parent"
        app:layout_constraintHorizontal_bias="0.5"
        app:layout_constraintStart_toStartOf="parent"
        app:layout_constraintTop_toTopOf="parent" />

</android.support.constraint.ConstraintLayout>