Official Python Image Library Handbook Link
You can import the PIL library, load an image, and resave it rotated 45 degrees as follows:
from PIL import Image
img = Image.open('cat.jpg')
new = img.rotate(45)
new.save('new.png')
The object name ‘img’ could be any other name you choose.
The open function stores the image data from your file into an object in memory.
To call an object’s functions, follow this pattern:
object_name.function_name()
Replace ‘object_name’ with the object’s actual name, and replace ‘function_name’ with the actual name of a function that belongs to that object’s class.
Don’t forget the parentheses at the end! Function calls always need parentheses.
Example PIL Functions
Resize an image to 50 pixels wide by 100 pixels tall:
new_img = img.resize( [50,100] )
Rotate an image 45 degrees:
new_img = img.rotate(45)
Save an image as a PNG file:
img.save("filename.png", "PNG")
Convert an image to “RGBA” mode (“A” is alpha, which is opacity)
rgba_img = img.convert("RGBA")
Crop image: get the box from x = 20 to 100 and y = 50 to 75
img.crop( (20,50,100,75) )
#the parameter is a 4 item tuple: (x1, y1, x2,  y2)
Paste a cat image object onto a background image object:
background.paste(cat, (40,80) )
#image's top corner will be at x=40, y=80
Paste a solid green rectangle onto an image:
img.paste( (0,255,0), (20,20,150,150) )
#first parameter is color tuple: (R,G,B)
#second parameter is box coords: (x1,y1,x2,y2)
Create a blank RGBA image with all blue colors:
blue_blank = PIL.Image.new("RGBA", (300,400), "blue")
#size attribute is a tuple: (width, height)
#color can also be given as a tuple, like (0,0,0,255)
Apply the BLUR filter to an image:
blurred_img = img.filter(PIL.ImageFilter.BLUR)
Blend two images together:
blended = PIL.Image.blend(img1, img2, 0.80)
#img2 gets 80%, so img1 gets 20%
Load pixel data from an image and access the RGB values.
#Get the pixel data:
pixels = img.load()

#Store the RGB values from pixel (0,0):
red = pixels[0,0][0]
green = pixels[0,0][1]
blue = pixels[0,0][2]

#Change a pixel at (5,5) to red:
pixels[5,5] = (255, 0, 0)
Looping through the pixels in an image
You can use nested loops to loop through every x and y value in the pixel array. The loops below look at the color values of an image and switch the values for blue and red to modify every pixel individually.
pixels = img.load()
width = img.size[0]
height = img.size[1]

for x in range(width):
    for y in range(height):

        #retrieve original color values
        r = pixels[x,y][0]
        g = pixels[x,y][1]
        b = pixels[x,y][2]

        #update color with blue and red switched
        pixels[x,y] = (b,g,r)
Useful attributes:
image_name.size –> (width, height) of the image (as a tuple)
image_name.size[0] –> width (item 0 in the tuple)
image_name.size[1] –> height (item 1 in the tuple)
image_name.format –> format, such as “JPEG” or “PNG”
image_name.mode –> mode, such as “RGB” or “RGBA”
(RGB is red/green/blue; RGBA is red/green/blue/alpha; alpha is opacity, which is the opposite of transparency)
Image Formats
Common formats: JPEG, BMP, PNG, and L.
PNG is useful since it has an alpha channel (can use RGBA mode).
L is a single channel (black and white) format.
Image Modes
“RGB”: red, green, blue
“RGBA”: reg, green, blue, alpha
“L”: lightness
File Management / Working Directories
You have to pay attention to what folder your program files and image files are located in. If you ignore that stuff, you’ll get error messages.
When you list a file name, python will look for it in your working directory.
In Canopy, you can set your working directory as indicated below:
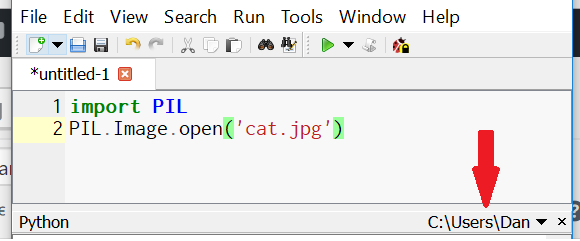
You want to keep your python file (ends with .py) in the same folder as your image files. Then make that folder your working directory.
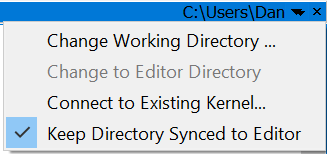
You can use the “Keep Directory Synced to Editor” option to make the working directory automatically change to the folder where your current python program file is located:
The PLTW curriculum uses ‘import os.path‘ to setup file names. It’s the part of the example programs that looks like this:
directory = os.path.dirname(os.path.abspath(__file__))
filename = os.path.join(directory, 'cat.jpg')
img = PIL.Image.open(filename)
This creates a variable (filename in this case) that stores a string that is a combination of a folder name and the file name:
print filename:
C:\Users\Dan\Documents\Course_CSP\1.4 Graphics\cat.jpg
Then you use filename as the input parameter to the open() function instead of typing a string literal such as “cat.jpg.” Either way works.
If you do it this way, python won’t care what your working directory is. Instead, it’s looking for your picture file in the same folder as your python program file.
If your program isn’t saved (and it says “untitled” on the top of the tab), this method won’t work. Save your file to fix that issue.
Hint: type “ls” into your python window to list the files in your current working directory. Then see if your image file appears in the list. If not, either the file isn’t in the right place, or you need to change your working directory.